Alex Newnes explains how he gap shoots in this two-parter! He gives some great advice to get you ready for when lockdown ends and we are back outdoors!
Gap shooting is one of the primary aiming systems employed by archers who do not use a sight. It is a method of aiming where you use the tip of your arrow at full draw as a reference point and place it a certain distance below or above (or on!) the target that you want to hit.
Gap shooting is often the starting point for archers and you may remember this from your beginner's course or from barebow archery before graduating to stringwalking. The rules vary slightly between target, WA Field, and WA 3D so make sure you check the rules of shooting for what is most applicable for you and your bow style.
For traditional archers shooting field or 3D under WA rules, we must shoot with a fixed grip on the string and a fixed anchor point, meaning we cannot facewalk or stringwalk. For target, you can shoot with a different anchor point for each distance, but you still may need to gap shoot in order to get a point of aim on the target.
For English longbow target shooting, you can use a marker on the limb or the ground to assist in aiming. However, for field and 3D archery, no aiming marks are permitted on longbows, flatbows or recurves.
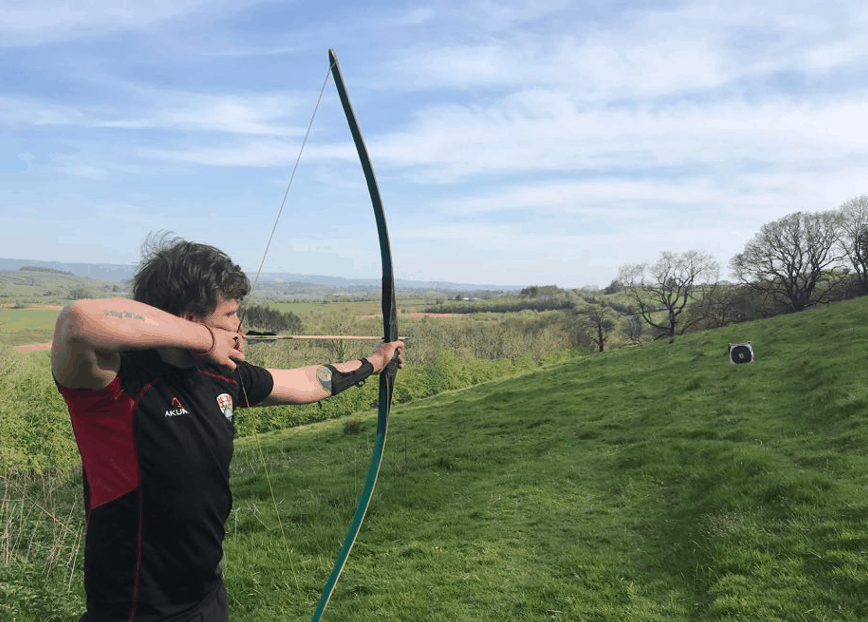
Some gap shooting in action, courtesy of GB Athlete Beth Duthie at the 2018 WA EU3D Championships in Gothenburg.
In this article, I am going to talk about how I gap shoot and how I find my gaps.
We are going to work out where to place our arrow point in order to hit the centre of the target. When we are back outdoors and out of lockdown, and able to shoot 18m/20y, you can either go straight to that distance or try the below.
If I have access to a large 80cm or 122cm boss, I like to start at 5m (use yards if this is what you want to practice. I use metres so I can apply my gaps to WA Field and 3D rounds). Place a pin or a peg loose to the bottom of your target boss (*It is important that we put this low on the target as our arrows will impact high and we don't want to shoot over the boss*).
Here I am standing 5m from my target, putting my arrow point on the target pins in the base, and executing my shot. You can see the arrows landing in the target ~10inches above the pins.
Shoot a group of arrows aiming with your arrow point on these target pins. Now measure the distance between that pin and centre of your group. This distance is your 5m gap.
Walk back another 5m and repeat. Your arrows will likely impact higher on the boss. The distance between the pins and the grouping is your 10m gap. Now continue working backwards in 5m increments to your max distance.
If my gaps are large, I put my boss on the stand and I like to hang a target face below the boss so I can continue to work backwards, using the centre or the bottom of this hanging target face as my point of aim to avoid overshooting the boss.
As you approach your point on distance, your gap will start to reduce.
A point of aim on the target often gives a much more comfortable and repeatable reference point!
Your Â"point on” distance is the distance where your arrow impacts the target at the same place as your arrow point when aiming at full draw (See picture above). With my current set up for WA3D for example, my point on distance is 30m: I know that when shooting a target 30m away if I put my arrow point on the centre of the target and release, my arrow should hit that target.
Once you move further beyond your point on distance, your arrows impact low, so you are measuring the distance above the target you have to aim to hit.
If all I have is a 60cm boss or a bag target, I start by working out my point on distance first, then work backwards - walking towards the boss, aiming further and further below as I move forward (this helps to prevent overshooting at a closer range).
Pentref legend and experienced gap shooter John Davies, showing us how it's done at the 2019 AB&O Field championships.
It can also be helpful to note other reference points at some of your distances. This can be things like boss stands, other target faces, the position of your shelf rather than your arrow point, or even things like the number of fingers below the target your point of aim has to be.
The key is to record and learn at least one thing for each distance, so when shooting a round, you know where to place your arrow for each distance.
Gap shooting can be a very accurate and reliable method. While it may seem daunting and can be uncomfortable aiming below the target, with just a little practice, trial, and error it can be an incredibly useful tool on the field course or at the range.
.jpg)